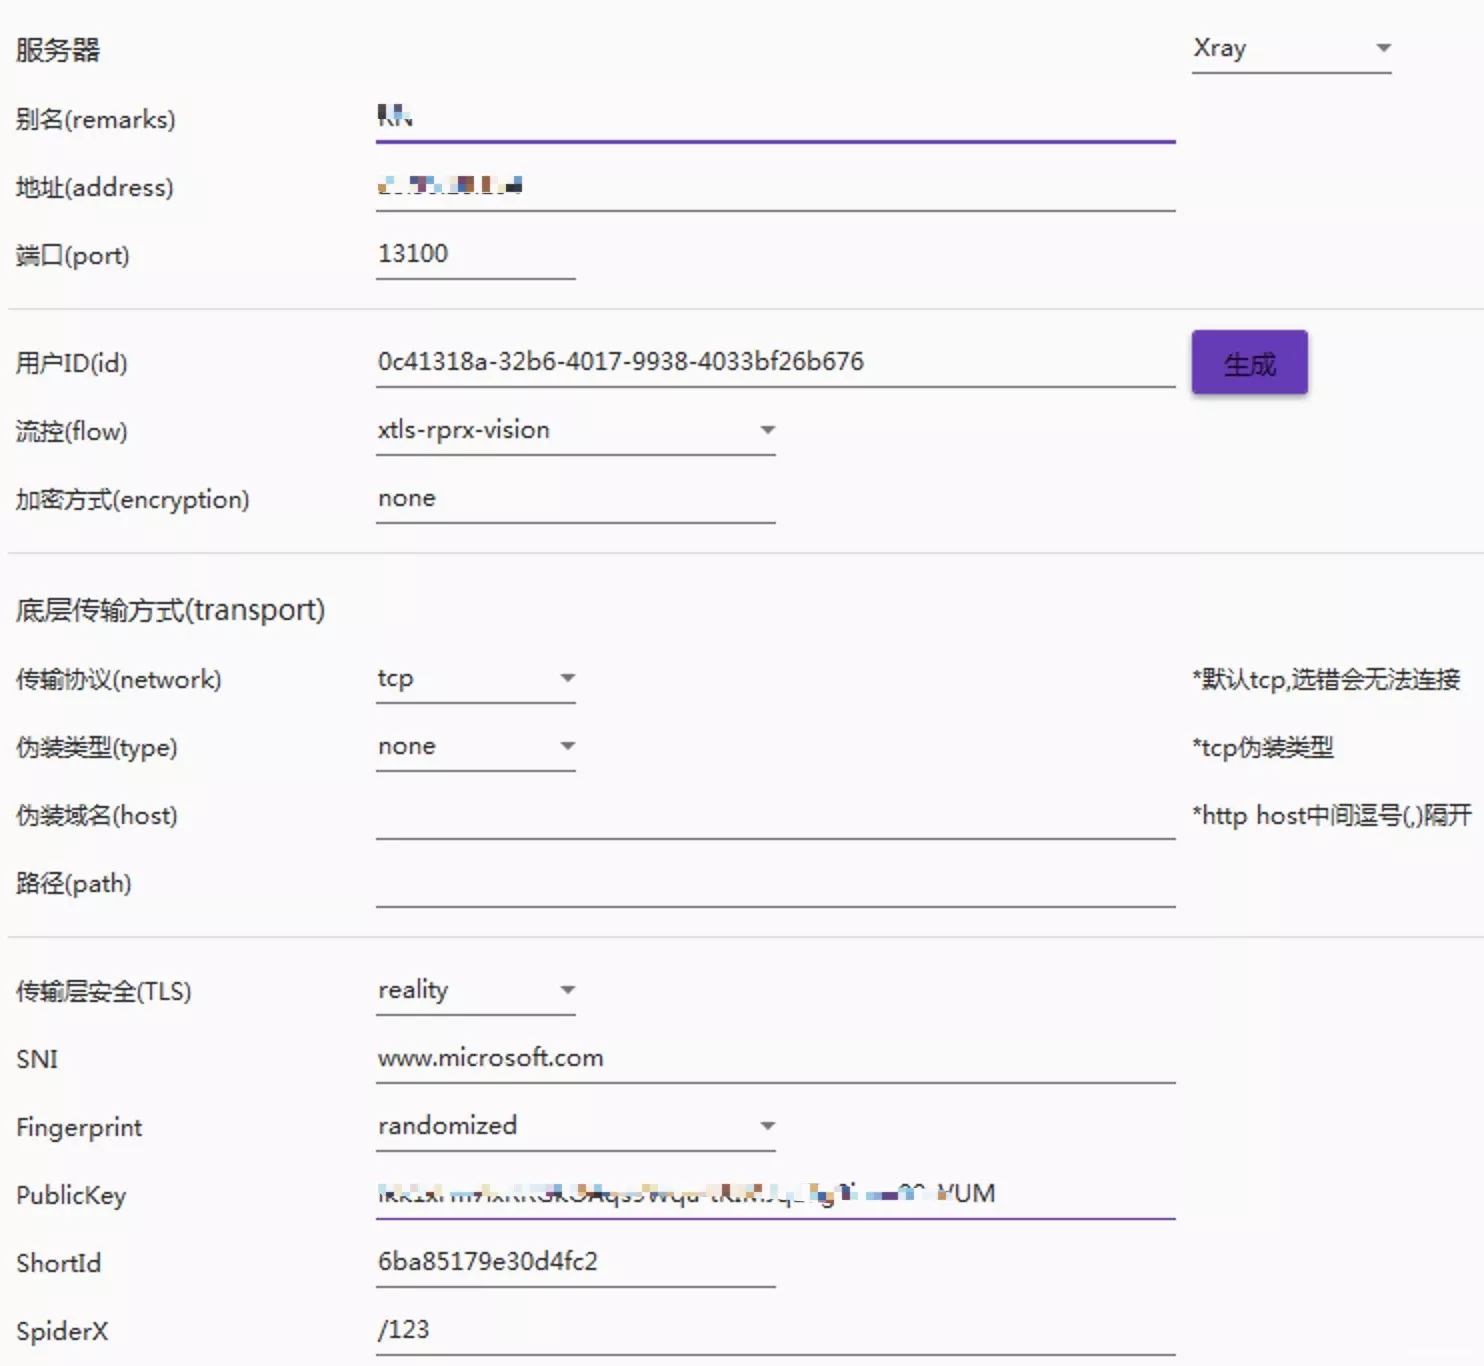
xray配置使用reality
最近xray新版本1.8发布了,备受期待的reality也随之而来,下面介绍一下我折腾reality的过程。
首先是去reality的官方仓库查看一下R佬写的模板,git地址:REALITY
模板文件
下面开始配置reality服务器端,配置模板如下:
{
"inbounds": [ // 服务端入站配置
{
"listen": "0.0.0.0",
"port": 443,
"protocol": "vless",
"settings": {
"clients": [
{
"id": "", // 必填,执行 ./xray uuid 生成,或 1-30 字节的字符串
"flow": "xtls-rprx-vision" // 选填,若有,客户端必须启用 XTLS
}
],
"decryption": "none"
},
"streamSettings": {
"network": "tcp",
"security": "reality",
"realitySettings": {
"show": false, // 选填,若为 true,输出调试信息
"dest": "example.com:443", // 必填,格式同 VLESS fallbacks 的 dest
"xver": 0, // 选填,格式同 VLESS fallbacks 的 xver
"serverNames": [ // 必填,客户端可用的 serverName 列表,暂不支持 * 通配符
"example.com",
"www.example.com"
],
"privateKey": "", // 必填,执行 ./xray x25519 生成
"minClientVer": "", // 选填,客户端 Xray 最低版本,格式为 x.y.z
"maxClientVer": "", // 选填,客户端 Xray 最高版本,格式为 x.y.z
"maxTimeDiff": 0, // 选填,允许的最大时间差,单位为毫秒
"shortIds": [ // 必填,客户端可用的 shortId 列表,可用于区分不同的客户端
"" // 若有此项,客户端 shortId 可为空
"0123456789abcdef" // 0 到 f,长度为 2 的倍数,长度上限为 16
]
}
}
}
]
}
clients参数
clients
的配置和以前的vless
配置一样,id
可以使用xray
核心程序来生成:
root@r-6c5317:~/xray# ./xray uuid
94281a1a-33bc-445a-ace9-0fdd56a0c14a
stramSettings
最重要的配置是streamSettings
的配置,security
要配置成reality
,dest
官方建议如下:
通常代理用途,目标网站最低标准:国外网站,支持 TLSv1.3 与 H2,域名非跳转用(主域名可能被用于跳转到 www)
加分项:IP 相近(更像,且延迟低),Server Hello 后的握手消息一起加密(如 dl.google.com),有 OCSP Stapling
配置加分项:禁回国流量,TCP/80、UDP/443 也转发(REALITY 对外表现即为端口转发,目标 IP 冷门或许更好)
当我们选择了一个dest
域名后,可以使用xray核心来确定serverNames
如何填,我们先来看看xray核心有那些命令可以使用:
root@r-6c5317:~/xray# ./xray -h
Xray is a platform for building proxies.
Usage:
xray <command> [arguments]
The commands are:
run Run Xray with config, the default command
version Show current version of Xray
api Call an API in an Xray process
tls TLS tools
uuid Generate UUIDv4 or UUIDv5
x25519 Generate key pair for x25519 key exchange
Use "xray help <command>" for more information about a command.
serverNames
有一个tls tools,可以使用它来确定serverNames
,执行 xray tls ping 目标网站网址,填 "Allowed domains" 的值。我这里使用微软的域名,所以情况如下:
root@r-6c5317:~/xray# ./xray tls ping www.microsoft.com
Tls ping: www.microsoft.com
Using IP: 23.3.85.234
-------------------
Pinging without SNI
Handshake succeeded
Allowed domains: [wwwqa.microsoft.com www.microsoft.com staticview.microsoft.com i.s-microsoft.com microsoft.com c.s-microsoft.com privacy.microsoft.com]
-------------------
Pinging with SNI
handshake succeeded
Allowed domains: [wwwqa.microsoft.com www.microsoft.com staticview.microsoft.com i.s-microsoft.com microsoft.com c.s-microsoft.com privacy.microsoft.com]
Tls ping finished
可以把上面的域名填写到serverNames
中,客户端在使用的时候找一个域名来填写。
privateKey
下边说一下privateKey
参数,也是要使用xray核心程序来生成的,在上面我们查看xray -h的时候有一个x25519的命令,生成如下:
root@r-6c5317:~/xray# ./xray x25519
Private key: YIHyZpW1NJLck_XTCG8IYMMqq1JG7w2Vm95HMAbB51g
Public key: Xh_hBw4E5SBFjreeAQQjnUMlvLvFPeELy2Xdvur6XwU
服务器端就使用 privateKey
,客户端在使用的时候就用publicKey
。
完整服务端配置
所以完整的xray服务端的配置config.json如下:
{
"log": {
"loglevel": "warning",
"access": "/var/log/xray/access.log",
"error": "/var/log/xray/error.log"
},
"api": {
"services": [
"HandlerService",
"LoggerService",
"StatsService"
],
"tag": "api"
},
"inbounds": [
{
"listen": null,
"port": 13100,
"protocol": "vless",
"settings": {
"clients": [
{
"id": "0c41318a-32b6-4017-9938-4033bf26b111",
"flow": "xtls-rprx-vision"
}
],
"decryption": "none"
},
"streamSettings": {
"network": "tcp",
"security": "reality",
"realitySettings": {
"show": false,
"dest": "www.microsoft.com:443",
"xver": 0,
"serverNames": [
"www.microsoft.com"
],
"privateKey": "YIHyZpW1NJLck_XTCG8IYMMqq1JG7w2Vm95HMAbB51g",
"shortIds": [
"6ba85179e30d4fc2"
]
}
},
"sniffing": {
"enabled": true,
"destOverride": [
"http",
"tls"
]
}
}
],
"outbounds": [
{
"tag":"common",
"protocol": "freedom"
},
{
"protocol": "blackhole",
"settings": {},
"tag": "blocked"
}
],
"routing": {
"rules": [
{
"type": "field",
"outboundTag": "common",
"network": "udp,tcp"
},
{
"type": "field",
"outboundTag": "blocked",
"ip": [
"geoip:cn",
"geoip:private"
]
}
]
},
"policy": {
"statsInboundUplink": true,
"statsInboundDownlink": true,
"statsOutboundUplink": true,
"statsOutboundDownlink": true
},
"dns": null,
"transport": null,
"stats": null,
"reverse": null,
"fakeDns": null
}
客户端配置
客户端我使用的是v2rayN,配置如下:
以上就是折腾的整个过程,完美上网。