docker配置fail2ban拦截nginx非法请求ip
环境与目录情况
ubuntu@VM-20-3-ubuntu:~/images/fail2ban$ tree
.
├── data
│   ├── filter.d
│   │   └── nginx-cc.conf
│   └── jail.d
│       ├── nginx-cc.conf
│       ├── sshd.conf
├── docker-compose.yaml
├── .env
└── logsnginx-cc,filter.d和jail.d中的配置文件名称一致。过滤配置
[Definition]
failregex = ^<HOST> .* "(GET|POST|HEAD).*HTTP.*" (404|503) .*$
ignoreregex =.*(robots.txt|favicon.ico|jpg|png)failregex配置的就是针对错误访问日志进行过滤的正则表达试,以ip开头,并把ip使用`<HOST>`代替。这里是针对访问状态是404和503的请求。ignoreregex配置了针对什么样的路径日志进行忽略。监狱配置
[nginx-cc]
enabled = true
filter = nginx-cc
chain = DOCKER-USER
#action = iptables-multiport[name=nginx-cc, port="http,https", protocol=tcp]
port = http,https
logpath = /var/logs/nginx/access.log
maxretry = 3
bantime = 86400
findtime = 3600
ignoreip = 192.168.0.1/24
下边详细说明一下各参数:
filter对应的就是上边的过滤规则中的名称chain为DOCKER-USER,因为nginx是使用docker安装的,所以需要把iptables的规则添加到DOCKER-USER中,DOCKER-USER中的规则在Docker自动创建的任何规则之前加载,拥有更高的优先级。port满足添加是禁止的端口logpath读取的日志路径findtime日志文件中分析错误连接数的时间。以秒计算启动配置
ubuntu@VM-20-3-ubuntu:~/images/fail2ban$ docker exec fail2ban fail2ban-client reload
OK
再来查看当前生效的监狱有哪些:
ubuntu@VM-20-3-ubuntu:~/images/fail2ban# docker exec fail2ban fail2ban-client status
Status
|- Number of jail:      2
`- Jail list: nginx-cc, sshd可以看到nginx-cc监狱已经生效了,再来看一下这个监狱的详细情况:
ubuntu@VM-20-3-ubuntu:~/images/fail2ban# docker exec fail2ban fail2ban-client status nginx-cc
Status for the jail: nginx-cc
|- Filter
|  |- Currently failed: 0
|  |- Total failed:     134
|  `- File list:        /var/logs/nginx/access.log
`- Actions
   |- Currently banned: 0
   |- Total banned:     21
   `- Banned IP list:
可以看到鉴于的详细信息,此时不出意外就可以拦截到那些异常情况了。
遇到的问题
不出意外,肯定会出意外。我在debian11的机器上安装,请求404的url会被记录到Total failed里,并且请求失败的ip也会出现在Banned Ip list里,但是被ban后竟然还可以访问,此时通过查看fail2ban容器发现竟然添加iptables规则的时候出现了异常。
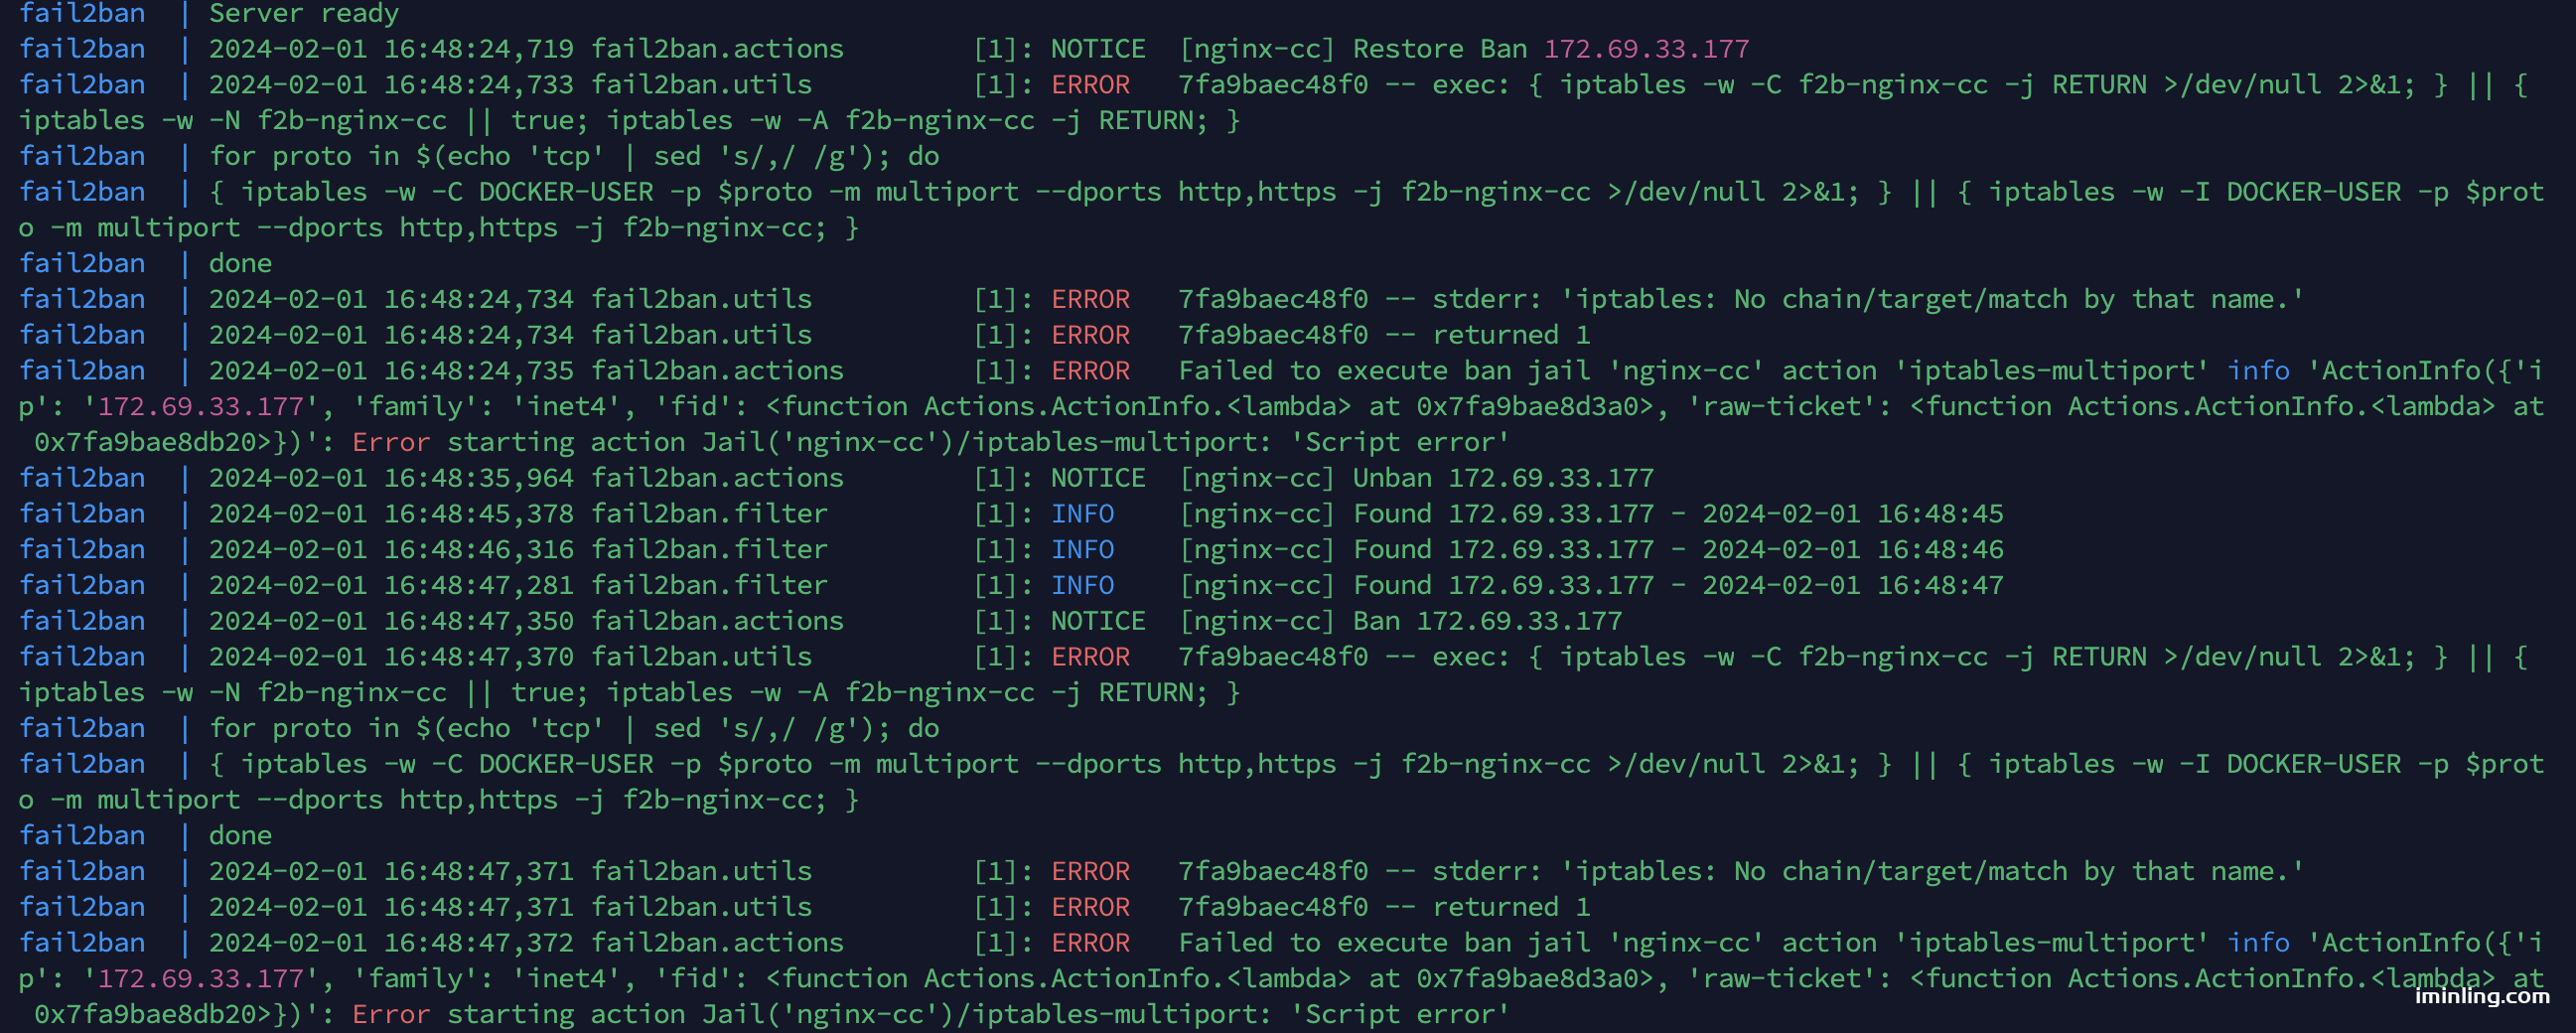
如上图,出现iptables: No chain/target/match by that name 错误,导致iptables规则添加失败,通过iptables -nvL的确也看不添加的被禁的ip。在网上找了好久不知道是什么原因,后来发现官方的github仓库的说明里就有关于这个的说明crazy-max/docker-fail2ban:
If your system's
iptablestooling uses the nftables backend, this will throw the errorstderr: 'iptables: No chain/target/match by that name.'. You need to switch theiptablestooling to 'legacy' mode to avoid these problems. This is the case on at least Debian 10 (Buster), Ubuntu 19.04, Fedora 29 and newer releases of these distributions by default. RHEL 8 does not support switching to legacy mode, and is therefore currently incompatible with this image.
原来是因为iptable的模式问题,默认debian11使用的nf_tables模式,按照官方的提示需要切换为legacy模式,如何查看自己的iptables是哪种模式呢?可以使用iptables --version来查看,如下就使用的是nf_tables模式。
ubuntu@VM-20-3-ubuntu:~# iptables --version
iptables v1.8.7 (nf_tables)那如何修改成legacy模式呢?官方也给了解决方案:
On Ubuntu or Debian:
$ update-alternatives --set iptables /usr/sbin/iptables-legacy
$ update-alternatives --set ip6tables /usr/sbin/ip6tables-legacy
$ update-alternatives --set arptables /usr/sbin/arptables-legacy
$ update-alternatives --set ebtables /usr/sbin/ebtables-legacy
On Fedora:
$ update-alternatives --set iptables /usr/sbin/iptables-legacy我的系统是debian,所以按照上边的四条来执行,后边两条并没有执行成功,提示没有开启,那就不管了。执行完后可以再使用上边的version命令查看模式是否已经改过来了:
ubuntu@VM-20-3-ubuntu:~/images/fail2ban# iptables --version
iptables v1.8.7 (legacy)
ubuntu@VM-20-3-ubuntu:service networking restart可以看到,已经切换成功了,并且重启了networking服务。此时再去看禁止ip发现还是不行,仍然可以访问,官方建议重启,我以为重启networking就可以了,但是并不行,最后只好对服务器进行了重启,最终终于生效,成功的对异常访问ip进行了禁止。
以上就是折腾过程,希望可以帮助到大家。
作者:要名俗气
链接:https://www.iminling.com/2024/02/05/431.html
来源:分享
文章版权归作者所有,未经允许请勿转载。